顯示具有 C# 標籤的文章。 顯示所有文章

2018/2/13

【C#】關於UI跨執行緒控制元件的問題

情境說明:在視窗介面開發常常會為了避免視窗凍結而將執行較久的函數用執行緒(Threading)去執行,若過程中需要把一些資訊丟到視窗元件上或是從視窗元件取得特定資料,就會發生跨執行緒存取權限的問題(=> 使用的執行緒與建立控制項的執行緒不同)。

解決方法:透過C# Delegate(委派)機制把工作丟給另個執行緒(控制元件的執行緒)代為處理

委派的寫法其實很簡單,其實就是幫元件寫個CallBack Function,在函數中首先先判斷元件是否在同個執行緒,若不是則呼叫CallBack Function(底下範例的if區塊),如果是則看需求把動作完成即可
 1
 2
 3
 4
 5
 6
 7
 8
 9
10
11
12
13
delegate void TextBoxAppendCallback(TextBox Ctl, string Str);
public void TextBoxAppend(TextBox Ctl, string Str)
{
    if (Ctl.InvokeRequired)
    {
        TextBoxAppendCallback d = new TextBoxAppendCallback(TextBoxAppend);
        this.Invoke(d, new object[] { Ctl, Str });
    }
    else
    {
        Ctl.AppendText(Str);
    }
}
若只有幾個地方需要用到元件存取,可以考慮偷懶一點的寫法
1
2
3
4
this.Invoke((MethodInvoker)delegate()
{
    textBox1.AppendText("Hello, Sleep 3 Seconds ..." + Environment.NewLine);
});

完整範例

 1
 2
 3
 4
 5
 6
 7
 8
 9
10
11
12
13
14
15
16
17
18
19
20
21
22
23
24
25
26
27
28
29
30
31
32
33
34
35
36
37
38
39
40
41
42
public partial class Form1 : Form
{
	public Form1()
	{
		InitializeComponent();
	}

	delegate void TextBoxAppendCallback(TextBox Ctl, string Str);
	public void TextBoxAppend(TextBox Ctl, string Str)
	{
		if (Ctl.InvokeRequired)
		{
			TextBoxAppendCallback d = new TextBoxAppendCallback(TextBoxAppend);
			this.Invoke(d, new object[] { Ctl, Str });
		}
		else
		{
			Ctl.AppendText(Str);
		}
	}

	private void Test()
	{
		this.Invoke((MethodInvoker)delegate()
		{
			textBox1.AppendText("Hello, Sleep 3 Seconds ..." + Environment.NewLine);
		});
		Thread.Sleep(3000);
		this.Invoke((MethodInvoker)delegate()
		{
			textBox1.AppendText("I'm Back, Oh Wait One More Second, Please ..." + Environment.NewLine);
		});
		Thread.Sleep(1000);
		TextBoxAppend(textBox1, "Everything Is Done" + Environment.NewLine);
	}

	private void button1_Click(object sender, EventArgs e)
	{
		var thread = new Thread(Test);
		thread.Start();
	}
}

2017/12/28

【C#】偵測Disk插入/卸除


要在C#中偵測磁碟機的改變(新增/插入、移除/卸除)可以透過ManagementEventWatcher類別加上Windows提供的WMI來達到此功能,直接看程式碼內容:

 1
 2
 3
 4
 5
 6
 7
 8
 9
10
11
12
13
14
15
16
17
18
19
20
21
22
23
24
25
26
27
28
29
30
31
32
33
34
using System;
using System.Collections.Generic;
using System.Linq;
using System.Text;
using System.Management;

namespace DiskDetect
{
    class Program
    {
        static void Main(string[] args)
        {
            ManagementEventWatcher watcher = new ManagementEventWatcher();
            WqlEventQuery query = new WqlEventQuery("SELECT * FROM Win32_VolumeChangeEvent WHERE EventType = 2 or EventType = 3");
            watcher.EventArrived += new EventArrivedEventHandler(watcher_EventArrived);
            watcher.Query = query;
            watcher.Start();

            Console.ReadLine();
        }

        static void watcher_EventArrived(object sender, EventArrivedEventArgs e)
        {
            if (Convert.ToInt16(e.NewEvent.Properties["EventType"].Value) == 2)
            {
                Console.WriteLine("Disk Insert: " + e.NewEvent.Properties["DriveName"].Value);
            }
            else
            {
                Console.WriteLine("Disk Remove: " + e.NewEvent.Properties["DriveName"].Value);
            }
        }
    }
}

參考連結:
ManagementEventWatcher Class
Win32_VolumeChangeEvent

Keyword: How to detect disk state in C# language

2015/2/7

【C#】客製化外觀的三態按鈕(Three State CheckBox)

.NET提供的CheckBox元件本身就支援三態按鈕(三種選取狀態),只要把屬性ThreeState設定為True即可
但有時候預設的外觀顯示與操作體驗可能無法準確呈現使用情境,這時可以新建一個類別繼承CheckBox並重載OnPaint與OnClick方法來客製化符合使用情境的三態按鈕
 1
 2
 3
 4
 5
 6
 7
 8
 9
10
11
12
13
14
15
16
17
18
19
20
21
22
23
24
25
26
27
28
29
30
31
32
33
34
35
36
37
38
class CheckBoxTriState : CheckBox
{
    public CheckBoxTriState()
    {
        ThreeState = true;
        CheckState = System.Windows.Forms.CheckState.Indeterminate;
        Text = String.Empty;
        Size = new Size(20, 40);
    }

    protected override void OnPaint(PaintEventArgs pevent)
    {
        Graphics g = pevent.Graphics;
        g.Clear(Color.LightGray);
        Brush b = new SolidBrush(Color.DarkGray);
        g.DrawRectangle(new Pen(b), 0, 0, Width, Height);

        float radius = (float)(Width * 0.9);
        float margin = (float)(Width * 0.05);
        if (CheckState == System.Windows.Forms.CheckState.Indeterminate)
            g.FillEllipse(b, margin, (float)(Height / 4.0) + margin, radius, radius);
        else if (CheckState == System.Windows.Forms.CheckState.Checked)
            g.FillEllipse(b, margin, margin, radius, radius);
        else
            g.FillEllipse(b, margin, (float)(Height / 2.0 - margin), radius, radius);
    }

    protected override void OnClick(EventArgs e)
    {
        Point pos = this.PointToClient(Cursor.Position);
        if (pos.Y < Height / 3)
            CheckState = System.Windows.Forms.CheckState.Checked;
        else if (pos.Y > Height * 2 / 3)
            CheckState = System.Windows.Forms.CheckState.Unchecked;
        else
            CheckState = System.Windows.Forms.CheckState.Indeterminate;
    }
}
使用方始與一般的CheckBox相同
 1
 2
 3
 4
 5
 6
 7
 8
 9
10
11
12
13
14
15
16
17
18
19
20
public partial class Form1 : Form
{
    public Form1()
    {
        InitializeComponent();
        CheckBoxTriState check = new CheckBoxTriState();
        check.Location = new Point(10, 10);
        Controls.Add(check);

        CheckBoxTriState check2 = new CheckBoxTriState();
        check2.Location = new Point(40, 10);
        check2.CheckState = CheckState.Checked;
        Controls.Add(check2);

        CheckBoxTriState check3 = new CheckBoxTriState();
        check3.Location = new Point(70, 10);
        check3.CheckState = CheckState.Unchecked;
        Controls.Add(check3);
    }
}
Keyword:How to customize a tri-state checkbox / button in C#

2015/2/2

【C#】客制化可調大小的勾選元件(CheckBox)

CheckBox的方框大小是以Hard Coded方式寫死的,因此沒辦法藉由設定CheckBox任何參數來改變勾選框框的大小,但可以透過override方是依自己需求重新繪製方框,直接看程式碼:
 1
 2
 3
 4
 5
 6
 7
 8
 9
10
11
12
13
14
15
16
17
18
19
20
21
22
23
24
25
26
27
28
29
30
31
32
33
34
35
36
37
38
39
40
41
42
43
44
45
46
47
48
class CheckBoxEx : CheckBox
{
    public CheckBoxEx()
    {
    }

    public override string Text
    {
        get
        {
            return base.Text;
        }
        set
        {
            base.Text = value;
            Size size = TextRenderer.MeasureText(value, Font);
            if (Width < size.Width + ClientSize.Height)
                Width = size.Width + ClientSize.Height;
        }
    }

    public override Font Font
    {
        get
        {
            return base.Font;
        }
        set
        {
            base.Font = value;
            Size size = TextRenderer.MeasureText(Text, value);
            if (Width < size.Width + ClientSize.Height)
                Width = size.Width + ClientSize.Height;
        }
    }

    protected override void OnPaint(PaintEventArgs e)
    {
        int h = ClientSize.Height;
        Rectangle rc = new Rectangle(new Point(0, 0), new Size(h, h));
        e.Graphics.Clear(Parent.BackColor);
        ControlPaint.DrawCheckBox(e.Graphics, rc,
            this.Checked ? ButtonState.Checked : ButtonState.Normal);
        SizeF size = e.Graphics.MeasureString(Text, Font);
        e.Graphics.DrawString(Text, this.Font,
            new SolidBrush(Color.Blue), new PointF(h, size.Height < h ? (h - size.Height) / 2 : 0));
    }
}
重點在於重載OnPaint這個繪圖函數,在函數內使用ControlPaint.DrawCheckBox重新繪製方框外形,因重載了原本OnPaint,因此要自己把文字補畫上去(參考44 ~ 46行)。
  因重設字型大小或顯示文字內容會影響CheckBox的呈現寬度,因此一併重載TextFont屬性,當使用者更改這兩個屬性值,則要重新計算CheckBox的寬度,否則文字呈現可能會被截斷。
  使用方法跟一般CheckBox一樣:
1
2
3
4
5
6
CheckBoxEx check = new CheckBoxEx();
check.Location = new Point(40, 40);
check.ClientSize = new Size(30, 30);
check.Text = "Hello CheckBox";
check.Font = new System.Drawing.Font("新細明體", 18);
Controls.Add(check);

Keyword:Customize checkbox size

2015/1/7

【C#】重導向(Output Redirection)判斷

參考下面這段程式
1
2
3
4
5
6
7
8
class Program
{
    static void Main(string[] args)
    {
        Console.SetCursorPosition(36, Console.CursorTop);
        Console.WriteLine("Hello World");
    }
}
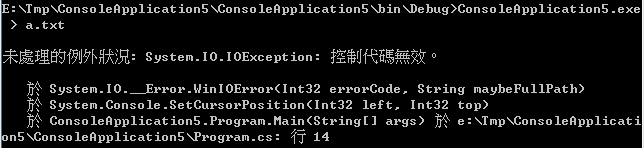
這段程式能將Hello World印在終端機(Terminal)的行中央,但如果今天使用者使用了重導向將輸出串流導向檔案時,則會看到System.IO.IOException的錯誤例外訊息
Google上找到有人寫了一個ConsoleEx類別可以判斷使用者是否使用了重導向輸出將結果寫到檔案。
 1
 2
 3
 4
 5
 6
 7
 8
 9
10
11
12
13
14
15
16
17
18
19
20
21
22
23
public static class ConsoleEx
{
    public static bool IsOutputRedirected
    {
        get { return FileType.Char != GetFileType(GetStdHandle(StdHandle.Stdout)); }
    }
    public static bool IsInputRedirected
    {
        get { return FileType.Char != GetFileType(GetStdHandle(StdHandle.Stdin)); }
    }
    public static bool IsErrorRedirected
    {
        get { return FileType.Char != GetFileType(GetStdHandle(StdHandle.Stderr)); }
    }
    private enum FileType { Unknown, Disk, Char, Pipe };
    private enum StdHandle { Stdin = -10, Stdout = -11, Stderr = -12 };
    [DllImport("kernel32.dll")]
    private static extern FileType GetFileType(IntPtr hdl);
    [DllImport("kernel32.dll")]
    static extern bool GetFileSizeEx(IntPtr hFile, out long lpFileSize);
    [DllImport("kernel32.dll")]
    private static extern IntPtr GetStdHandle(StdHandle std);
}
若偵測到使用者重導向則跳過Console相關的控制(如SetCursorPosition(), Clear())以避免發生錯誤。
1
2
3
4
5
6
7
8
9
class Program
{
    static void Main(string[] args)
    {
        if (!ConsoleEx.IsOutputRedirected)
            Console.SetCursorPosition(36, Console.CursorTop);
        Console.WriteLine("Hello World");
    }
}

但上述的ConsoleEx類別提供的方法在使用者將結果輸出到NUL時會判斷錯誤
後來上Stackoverflow詢問得到可以使用GetConsoleMode來判斷終端機模式:
 1
 2
 3
 4
 5
 6
 7
 8
 9
10
11
12
13
14
15
16
17
18
19
20
21
22
23
24
25
class Program
{
    private enum StdHandle { Stdin = -10, Stdout = -11, Stderr = -12 };
    [DllImport("kernel32.dll")]
    private static extern IntPtr GetStdHandle(StdHandle std);
    [DllImport("kernel32.dll")]
    [System.Runtime.Versioning.ResourceExposure(System.Runtime.Versioning.ResourceScope.Process)]
    internal static extern bool GetConsoleMode(IntPtr hConsoleHandle, out int mode);
    public static bool IsRedirected
    {
        get
        {
            int mode;
            GetConsoleMode(GetStdHandle(StdHandle.Stdout), out mode);
            return mode == 0;
        }
    }

    static void Main(string[] args)
    {
        if (!IsRedirected)
            Console.SetCursorPosition(36, Console.CursorTop);
        Console.WriteLine("Hello World");
    }
}

若使用的.Net Framework版本是在4.5以後的話則可以直接使用Console.IsOutputRedirected進行判斷
1
2
3
4
5
6
7
8
9
class Program
{
    static void Main(string[] args)
    {
    if (!Console.IsOutputRedirected)
        Console.SetCursorPosition(36, Console.CursorTop);
        Console.WriteLine("Hello World");
    }
}


Reference:

2015/1/5

【C#】讓使用者動態調整控制元件大小,以按鈕為例

讓控制元件(Control Components,如按鈕、標籤...等)可以供使用者自由調整大小,首先準備一個小圖示提示使用者該元件可以隨心所欲的調整大小。
接著在Form中新增一個按鈕(Button)元件,並命名為button1,將準備好的提示圖片加入button1的Image屬性,並設定ImageAlign為BottomRight,讓提示圖片顯示在按鈕的右下角。
在Form類別中加入成員屬性
1
private bool resize = false;
最後註冊按鈕的MouseMove事件即可:
在MouseMove事件中加入下列程式碼
 1
 2
 3
 4
 5
 6
 7
 8
 9
10
11
12
13
14
15
16
17
18
19
20
21
22
23
private void button1_MouseMove(object sender, MouseEventArgs e)
{
    Button btn = (Button)sender;
    if (e.Button == MouseButtons.Left && resize)
    {
        btn.Width = e.X;
        btn.Height = e.Y;
    }
    else
    {
        Point pt = btn.PointToClient(Control.MousePosition);
        if (pt.X > btn.Width - 5 && pt.Y > btn.Height - 5)
        {
            btn.Cursor = Cursors.SizeNWSE;
            resize = true;
        }
        else
        {
            btn.Cursor = Cursors.Default;
            resize = false;
        }
    }
}
首先判斷滑鼠移入控制元件範圍時resize變數是否已經被設定並且滑鼠左鍵有被按壓,先看else(resize變數還未設定這邊),用Control.MousePosition取得游標在螢幕的座標位置並運用button1的成員函數PointToClient算出游標在button1中的座標,判斷若游標靠近右下角5個畫素點的話就把游標圖示改成調整大小的游標圖示並將resize變數設定為true開啟調整大小的功能,否則將游標還原成預設圖示。
  接著看if區塊,只要符合調整大小的要素,就把按鈕的寬高分別指定為e.X與e.Y即可。

【C#】讓控制元件可在視窗中自由移動,以按鈕為例

  想讓控制元件(Control Component,如:按鈕、標籤...等)可以在視窗中自由移動只需要註冊MouseDown與MouseMove兩個事件並加入一些程式碼即可達成:
  1. 首先在Form中加入一個按鈕,在此範例名稱設定為button1
  2. 在Form類別中增加一個成員屬性
    private Point mouse_offset;
    
  3. 註冊button1的MouseDown事件,加入下面程式碼記錄滑鼠點擊位置(此位置是以按鈕左上角為原點的座標)
    private void button1_MouseDown(object sender, MouseEventArgs e)
    {
        mouse_offset = new Point(-e.X, -e.Y);
    }
    
  4. 註冊button1的MouseMove事件,加入下面程式碼
     1
     2
     3
     4
     5
     6
     7
     8
     9
    10
    private void button1_MouseMove(object sender, MouseEventArgs e)
    {
        if (e.Button == MouseButtons.Left)
        {
            Button btn = (Button)sender;
            Point mousePos = PointToClient(Control.MousePosition);
            mousePos.Offset(mouse_offset.X, mouse_offset.Y);
            btn.Location = mousePos;
        }
    }
    
    Control.MousePosition可以取得滑鼠在螢幕中的座標值,但因按鈕是附著於Form視窗,因此必須使用PointToClient方法把螢幕做標值轉換為Form視窗中的座標值。
    使用者可能是點擊按鈕左上角以外的位置,因此需使用第七行做Offset修正,否則移動放開後按鈕總會落在滑鼠的右下方。

2015/1/1

【C#】製作不規則形狀的控制元件,以按鈕為例

Custom Button, Irregularly shaped control
製作一個不規則的控制元件(Non-rectangular Controls)相對不規則視窗較為複雜一點,但也只是要自己多敲一些代碼而已,在示範中會運用GraphicsPath類別與控制元件的Paint事件來製作一對鬥雞眼按鈕:
  1. 首先在Form中加入一個按鈕(Button)元件,在此把該按鈕命名為CustomButton,並把Text顯示文字清空(清空文字只是為了讓外觀較為乾淨,若有需要可以設定要顯示的文字內容),按鈕大小設定為100x50
  2. 幫此按鈕註冊Paint事件,在此事件中運用GraphicsPath生成一個物件並設定欲顯示圖樣路徑,最將此物件指定給按鈕的Region屬性即可。
    private void CustomButton_Paint(object sender, PaintEventArgs e)
    {
        System.Drawing.Drawing2D.GraphicsPath myGraphicsPath = new System.Drawing.Drawing2D.GraphicsPath();
        myGraphicsPath.AddEllipse(new Rectangle(0, 0, 50, 50));
        myGraphicsPath.AddEllipse(new Rectangle(30, 35, 10, 10));
        myGraphicsPath.AddEllipse(new Rectangle(50, 0, 50, 50));
        myGraphicsPath.AddEllipse(new Rectangle(60, 35, 10, 10));
        CustomButton.BackColor = Color.Brown;
        CustomButton.FlatStyle = FlatStyle.Flat;
        CustomButton.FlatAppearance.BorderSize = 0;
        CustomButton.Region = new Region(myGraphicsPath);
    }
    
補充:

  1. GraphicsPath內建多種預設圖形,如:圓形、舉行、三角形,甚至是文字等,因此可以輕易透過疊加方式繪出各種客製化的形狀。
  2. 在GraphicsPath中的圖形疊加具有互斥或的效果,意思是如果兩個圖案有重疊到的區域會呈現挖空效果,但如果又有第三張圖片重疊上去,則三張圖片重疊的區域會被顯示。

2014/12/31

【C#】製作不規則的視窗

  在C#中要建立不規則視窗(Irregularly Shaped Window)非常簡單,只需要準備一張欲顯示形狀的底圖並修改幾個視窗屬性(Window Properties)即可完成:
  1. 設定FormBorderStyleNone

    可透過設定頁面完成設定或是直接撰寫程式
    FormBorderStyle = System.Windows.Forms.FormBorderStyle.None;
    
  2. 指定BackgroundImage並依據需求設定BackgroundImageLayout
  3. 設定TransparentKey為底圖不要顯示部分的顏色,若使用範例圖片則設定為白色
  4. 到目前為止已經完成客製化的視窗介面,編譯並執行可以看到視窗呈現愛心形狀,心型以外區域可以顯示桌面內容,點選心型以外的區域也可不受限制
  因為一開始我們把FormBorderStyle設定為None,邊框都不顯示連帶的最上面的標題列與控制盒(最小、縮小、最大化按鈕)也一併被取消了,因此若需要相關控制必須自行增加相關按鈕實現,底下示範移動視窗功能:
  1. 切換到檢視程式碼視窗,在視窗類別中增加變數
    private Point mouse_offset;
    
  2. 增加MouseDown事件
    private void Form1_MouseDown(object sender, MouseEventArgs e)
    {
        mouse_offset = new Point(-e.X, -e.Y);
    }
    
  3. 增加MouseMove事件
    private void Form1_MouseMove(object sender, MouseEventArgs e)
    {
        if (e.Button == MouseButtons.Left)
        {
            Point mousePos = Control.MousePosition;
            mousePos.Offset(mouse_offset.X, mouse_offset.Y);
            Location = mousePos;
        }
    }
    
  4. 若不是透過屬性視窗新增事件,記得自己手動加入事件註冊
    this.MouseDown += new System.Windows.Forms.MouseEventHandler(this.Form1_MouseDown);
    this.MouseMove += new System.Windows.Forms.MouseEventHandler(this.Form1_MouseMove);
    
  完成上述步驟後,此視窗就可以透過滑鼠左鍵拖曳進行移動了!

範例用圖:

2014/8/6

【C#】設定/查詢螢幕背光

  為了要能用C#控制螢幕背光,跟CreateFileDeviceIoControl函數奮戰大半天,一直搞不定DeviceIoControl函數使用,後來幸運的在網路上找到有人寫好class可以直接調用,之後有需要用到DeviceIoControl函數功能也能參考這class的做法。

調用方法很簡單:
1
2
3
LCDBrightness lcd = new LCDBrightness();
lcd.SetBrightness(100);                                 // Set backlight full on
LCDBrightness.Brightness value = lcd.GetBrightness();   // Query backlight value

原始class內容為:
  1
  2
  3
  4
  5
  6
  7
  8
  9
 10
 11
 12
 13
 14
 15
 16
 17
 18
 19
 20
 21
 22
 23
 24
 25
 26
 27
 28
 29
 30
 31
 32
 33
 34
 35
 36
 37
 38
 39
 40
 41
 42
 43
 44
 45
 46
 47
 48
 49
 50
 51
 52
 53
 54
 55
 56
 57
 58
 59
 60
 61
 62
 63
 64
 65
 66
 67
 68
 69
 70
 71
 72
 73
 74
 75
 76
 77
 78
 79
 80
 81
 82
 83
 84
 85
 86
 87
 88
 89
 90
 91
 92
 93
 94
 95
 96
 97
 98
 99
100
101
102
103
104
105
106
107
108
109
110
111
112
113
114
115
116
117
118
119
120
121
122
123
124
125
126
127
128
129
130
131
132
133
134
135
136
137
138
139
140
141
142
143
144
145
146
147
148
149
150
151
152
153
154
155
156
157
158
159
160
161
162
163
164
165
166
167
168
169
170
171
172
173
174
175
176
177
178
179
180
181
182
183
184
185
186
187
188
189
190
191
192
193
194
195
196
197
198
199
200
201
202
203
204
205
206
207
208
209
210
211
212
213
214
215
216
217
218
219
220
221
222
223
224
225
226
227
228
229
230
231
232
233
234
235
236
237
238
239
240
241
242
243
244
245
246
247
248
249
250
251
252
253
using Microsoft.VisualBasic;
using System;
using System.Collections;
using System.Data;
using System.Diagnostics;
using System.Drawing;
using System.Windows.Forms;
using System.Runtime.InteropServices;
/// <summary>
/// Permet de contrA’ler la luminositAc de l'Accran LCD (sous Windows XP SP2 et ultAcrieur)
/// </summary>
/// <remarks>Sous rAcserve que le driver de la carte graphique et/ou de l'Accran supporte cette interface</remarks>
namespace LCDBrightness
{
  public class LCDBrightness
  {
    //Ouvre un fichier ou un pAcriphAcrique
    [DllImport("kernel32")]
    private static extern IntPtr CreateFile (
        string lpFileName,
        uint dwDesiredAccess,
        int dwShareMode,
        IntPtr lpSecurityAttributes,
        int dwCreationDisposition,
        int dwFlagsAndAttributes,
        IntPtr hTemplateFile);

    //accA‥s en lecture, partagAc et ouverture uniquement d'un pAcriphAcrique existant
    private const uint GENERIC_READ = 0x80000000U;
    private const int SHARE_ALL = 0x7;
    private const int OPEN_EXISTING = 0x3;

    //indique l'Acclairage en mode d'alimentation AC ou DC ou les deux
    private const int DISPLAYPOLICY_AC = 1;
    private const int DISPLAYPOLICY_DC = 2;
    private const int DISPLAYPOLICY_BOTH = DISPLAYPOLICY_AC | DISPLAYPOLICY_DC;

    /// <summary>
    /// Indique les niveaux d'Acclairage en fonction du mode d'alimentation
    /// </summary>
    /// <remarks></remarks>
    public class Brightness
    {
      /// <summary>
      /// Eclairage en mode Alimentation
      /// </summary>
      /// <remarks></remarks>
      public byte AC;
      /// <summary>
      /// Eclairage en mode Batterie
      /// </summary>
      /// <remarks></remarks>
      public byte DC;
    }

    /// <summary>
    /// Contient les donnAces brutes des niveaux d'Acclairage
    /// </summary>
    /// <remarks></remarks>
    private struct DISPLAY_BRIGHTNESS
    {
      public byte ucDisplayPolicy;
      public byte ucACBrightness;
      public byte ucDCBrightness;
    }

    //envoie une requAate A  un pAcriphAcrique
    [DllImport("kernel32")]
    private static extern bool DeviceIoControl (
        IntPtr hDevice,
        int dwIoControlCode,
        ref DISPLAY_BRIGHTNESS lpInBuffer,
        int nInBufferSize,
        IntPtr lpOutBuffer,
        int nOutBufferSize,
        ref int lpBytesReturned,
        IntPtr lpOverlapped);
    [DllImport("kernel32")]
    private static extern bool DeviceIoControl (
        IntPtr hDevice,
        int dwIoControlCode,
        IntPtr lpInBuffer,
        int nInBufferSize,
        ref DISPLAY_BRIGHTNESS lpOutBuffer,
        int nOutBufferSize,
        ref int lpBytesReturned,
        IntPtr lpOverlapped);
    [DllImport("kernel32")]
    private static extern bool DeviceIoControl (
        IntPtr hDevice,
        int dwIoControlCode,
        IntPtr lpInBuffer,
        int nInBufferSize,
        [MarshalAs(UnmanagedType.LPArray)] byte[] lpOutBuffer,
        int nOutBufferSize,
        ref int lpBytesReturned,
        IntPtr lpOverlapped);

    //ferme un fichier ou un pAcriphAcrique
    [DllImport("kernel32")]
    private static extern int CloseHandle(IntPtr hObject);

#region IOCTL
    private const int FILE_DEVICE_VIDEO = 0x23;

    private const int FILE_ANY_ACCESS = 0;
    private const int FILE_SPECIAL_ACCESS = FILE_ANY_ACCESS;

    private const int METHOD_BUFFERED = 0;
    private const int METHOD_NEITHER = 3;

    private const int ERROR_INSUFFICIENT_BUFFER = 122;

    /// <summary>
    /// GA‥re la dAcfinition d'un code de requAate d'un pAcriphAcrique en fonction de ses catAcgories
    /// </summary>
    /// <param name="dwDeviceType">Type de pAcriphAcrique</param>
    /// <param name="dwFunction">RequAate</param>
    /// <param name="dwMethod">MActhode de la requAate</param>
    /// <param name="dwAccess">Mode d'accA‥s</param>
    /// <returns></returns>
    /// <remarks></remarks>
    private static int CTL_CODE(int dwDeviceType, int dwFunction, int dwMethod, int dwAccess)
    {
      return ((dwDeviceType) << 16) | ((dwAccess) << 14) | ((dwFunction) << 2) | (dwMethod);
    }

    //requAate de lecture des niveaux d'Aclcairage supportAcs
    private static int IOCTL_VIDEO_QUERY_SUPPORTED_BRIGHTNESS = CTL_CODE(FILE_DEVICE_VIDEO, 293, METHOD_BUFFERED, FILE_ANY_ACCESS);
    //requAate de lecture des niveaux d'Acclairage en cours
    private static int IOCTL_VIDEO_QUERY_DISPLAY_BRIGHTNESS = CTL_CODE(FILE_DEVICE_VIDEO, 294, METHOD_BUFFERED, FILE_ANY_ACCESS);
    //requAate de dAcfinition des niveaux d'Acclairage en cours
    private static int IOCTL_VIDEO_SET_DISPLAY_BRIGHTNESS = CTL_CODE(FILE_DEVICE_VIDEO, 295, METHOD_BUFFERED, FILE_ANY_ACCESS);
#endregion

    /// <summary>
    /// Ouvre un handle vers le pAcriphAcrique LCD
    /// </summary>
    /// <returns></returns>
    /// <remarks></remarks>
    private IntPtr OpenLCD()
    {
      //ouverture en lecture partagAce
      return CreateFile("\\\\.\\LCD", GENERIC_READ, SHARE_ALL, IntPtr.Zero, OPEN_EXISTING, 0, IntPtr.Zero);
    }

    private byte[] mBrightness = null;
    /// <summary>
    /// Renvoie la liste des niveaux d'Acclairage supportAcs
    /// </summary>
    /// <value></value>
    /// <returns></returns>
    /// <remarks></remarks>
    public byte[] SupportedBrightness {
      get {
        if (mBrightness == null) {
          int lpRet=0;
          byte[] ret;
          //essaie d'ouvrir le LCD
          IntPtr pDisplay = OpenLCD();
          //si erreur, probablement pas un portable
          if (pDisplay != new IntPtr(-1)) {
              ret = new byte[256];

            //envoie la requAate des niveaux supportAcs
            if (DeviceIoControl(pDisplay, IOCTL_VIDEO_QUERY_SUPPORTED_BRIGHTNESS, IntPtr.Zero, 0, ret, 256, ref lpRet, IntPtr.Zero)) {
              //rAccupA‥re un tableau d'octet contenant les niveaux
                mBrightness = new byte[lpRet];

              for (int i = 0; i < lpRet; i++) {
                mBrightness[i] = ret[i];
              }
            }

            CloseHandle(pDisplay);
          }
        }
        return mBrightness;
      }
    }

    /// <summary>
    /// Renvoie l'Acclairage en cours
    /// </summary>
    /// <returns>Eclairage en cours par modes d'alimentation</returns>
    /// <remarks></remarks>
    public Brightness GetBrightness()
    {
      int lpRet=0;
      Brightness ret = null;
      //essaie d'ouvrir le LCD
      IntPtr pDisplay = OpenLCD();
      //si erreur, probablement pas un portable
      if (pDisplay == new IntPtr(-1))
        return null;

      //envoie la requAate de lecture de l'Acclairage en cours
      DISPLAY_BRIGHTNESS pBrightness = new DISPLAY_BRIGHTNESS();
      if (DeviceIoControl(pDisplay, IOCTL_VIDEO_QUERY_DISPLAY_BRIGHTNESS, IntPtr.Zero, 0, ref pBrightness, Marshal.SizeOf(typeof(DISPLAY_BRIGHTNESS)), ref lpRet, IntPtr.Zero)) {
        //si OK, rAccupA‥re la valeur pour AC/Alimentation et DC/Batterie
        ret = new Brightness();
        ret.AC = pBrightness.ucACBrightness;
        ret.DC = pBrightness.ucDCBrightness;
      }

      CloseHandle(pDisplay);

      return ret;
    }

    /// <summary>
    /// DAcfinit l'Acclairage A  la mAame valeur pour les deux modes d'alimentation
    /// </summary>
    /// <param name="brightness">Niveau d'Acclairage</param>
    /// <returns>true si rAcussi, false sinon</returns>
    /// <remarks></remarks>
    public bool SetBrightness(int brightness)
    {
      return SetBrightness(brightness, brightness);
    }

    /// <summary>
    /// DAcfinit l'Acclairage par mode d'alimentation
    /// </summary>
    /// <param name="acBrightness">Niveau AC/Alimentation</param>
    /// <param name="dcBrightness">Niveau DC/Batterie</param>
    /// <returns>true si rAcussi, false sinon</returns>
    /// <remarks></remarks>
    public bool SetBrightness(int acBrightness, int dcBrightness)
    {
      bool ret;
      int lpRet=0;
      //essaie d'ouvrir le LCD
      IntPtr pDisplay = OpenLCD();
      //si erreur, probablement pas un portable
      if (pDisplay == new IntPtr(-1))
        return false;

      //remplit la structure et informe que l'on dAcfinit les deux valeurs
      DISPLAY_BRIGHTNESS pBrightness = new DISPLAY_BRIGHTNESS();
      pBrightness.ucACBrightness = (byte)(acBrightness & 0xFF);
      pBrightness.ucDCBrightness = (byte)(dcBrightness & 0xFF);
      pBrightness.ucDisplayPolicy = DISPLAYPOLICY_BOTH;

      //envoie la requAate de dAcfinition de l'Acclairage au pAcriphAcrique LCD
      ret = DeviceIoControl(pDisplay, IOCTL_VIDEO_SET_DISPLAY_BRIGHTNESS, ref pBrightness, Marshal.SizeOf(pBrightness), IntPtr.Zero, 0, ref lpRet, IntPtr.Zero);

      CloseHandle(pDisplay);

      return ret;
    }
  }
}

參考原始出處:http://codes-sources.commentcamarche.net/source/view/53617/1259513#browser

Keyword:C#, Windows, Backlight

2012/8/15

【C#】縮小命令提示字元視窗

今天同事提了個奇怪的需求:執行程式時要能把命令提是字元視窗縮小,查了一下網路發現可以利用FindWindow()與ShowWindow()兩個函數達成此需求,直接看以下範例:
 1
 2
 3
 4
 5
 6
 7
 8
 9
10
11
12
13
14
15
16
17
18
19
20
21
22
23
24
25
26
27
28
29
30
using System;
using System.Collections.Generic;
using System.Linq;
using System.Text;
using System.Runtime.InteropServices;

namespace HideConsole
{
    class Program
    {
        static void Main(string[] args)
        {
            IntPtr ParenthWnd = new IntPtr(0);
            
            ParenthWnd = Findindow(null, Console.Title);
            if (ParenthWnd == IntPtr.Zero)
                Console.WriteLine("Find Window ... FAIL");
            else
                ShowWindow(ParenthWnd, SW_SHOWMINIMIZED);
        }

        [DllImport("user32.dll", EntryPoint = "FindWindow")]
        private static extern IntPtr Findindow(string lpClassName, string lpWindowName);
        [DllImport("user32.dll", EntryPoint = "ShowWindow")]
        private static extern IntPtr ShowWindow(IntPtr hWnd, int type);
        const int SW_HIDE = 0;
        const int SW_SHOWMINIMIZED = 2;
        const int SW_MAXIMIZE = 3;
    }
}

流程說明:
  1. 用Console.Title找出命令提示字元視窗本身的標題字串,並透過FindWindow找出Handler
  2. 將Handler傳給ShowWindow函數,並傳入參數讓視窗進行改變,範例標了幾個視窗屬性SW_HIDE, SW_SHOWMINIMIZED與SW_MAXIMIZE,完整的參數可以參考MSDN的參考網頁( http://msdn.microsoft.com/en-us/library/windows/desktop/ms633548(v=vs.85).aspx
因使用了DllImport,記得要加入
1
using System.Runtime.InteropServices;

Keyword:How to Minimize Terminal on Windows、C# Programming、Minimize Command Prompt on Windows