2015/1/15

【Ubuntu】 開機自動登入Console

在Ubuntu上要設定開機後自動登入Console只需要三個步驟即可完成
  1. 安裝虛擬終端機程式mingetty
    1
    2
    sudo apt-get update
    sudo apt-get install mingetty
    
  2. 修改開機到文字介面
    1
    sudo vi /etc/default/grub
    
    GRUB_CMDLINE_LINUX_DEFAULT設定值改為text(原本是quiet splash

    設定完成後更新grub
    1
    sudo update-grub
    
  3. 設定自動登入
    1
    sudo vi /etc/init/tty1.conf
    
    exec /sbin/getty -8 38400 tty1修改成exec /sbin/mingetty --autologin root tty1即可
完成上述三個步驟,重新開機後就可以看到系統開啟文字終端機並且以root帳號自動登入,若要改成其他帳號登入,可將第三步驟的root改成對應帳號名稱。

2015/1/7

【C#】重導向(Output Redirection)判斷

參考下面這段程式
1
2
3
4
5
6
7
8
class Program
{
    static void Main(string[] args)
    {
        Console.SetCursorPosition(36, Console.CursorTop);
        Console.WriteLine("Hello World");
    }
}
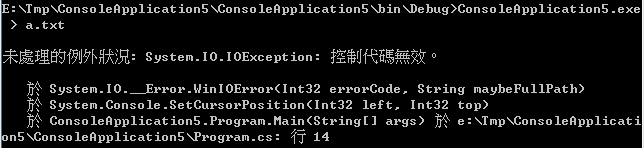
這段程式能將Hello World印在終端機(Terminal)的行中央,但如果今天使用者使用了重導向將輸出串流導向檔案時,則會看到System.IO.IOException的錯誤例外訊息
Google上找到有人寫了一個ConsoleEx類別可以判斷使用者是否使用了重導向輸出將結果寫到檔案。
 1
 2
 3
 4
 5
 6
 7
 8
 9
10
11
12
13
14
15
16
17
18
19
20
21
22
23
public static class ConsoleEx
{
    public static bool IsOutputRedirected
    {
        get { return FileType.Char != GetFileType(GetStdHandle(StdHandle.Stdout)); }
    }
    public static bool IsInputRedirected
    {
        get { return FileType.Char != GetFileType(GetStdHandle(StdHandle.Stdin)); }
    }
    public static bool IsErrorRedirected
    {
        get { return FileType.Char != GetFileType(GetStdHandle(StdHandle.Stderr)); }
    }
    private enum FileType { Unknown, Disk, Char, Pipe };
    private enum StdHandle { Stdin = -10, Stdout = -11, Stderr = -12 };
    [DllImport("kernel32.dll")]
    private static extern FileType GetFileType(IntPtr hdl);
    [DllImport("kernel32.dll")]
    static extern bool GetFileSizeEx(IntPtr hFile, out long lpFileSize);
    [DllImport("kernel32.dll")]
    private static extern IntPtr GetStdHandle(StdHandle std);
}
若偵測到使用者重導向則跳過Console相關的控制(如SetCursorPosition(), Clear())以避免發生錯誤。
1
2
3
4
5
6
7
8
9
class Program
{
    static void Main(string[] args)
    {
        if (!ConsoleEx.IsOutputRedirected)
            Console.SetCursorPosition(36, Console.CursorTop);
        Console.WriteLine("Hello World");
    }
}

但上述的ConsoleEx類別提供的方法在使用者將結果輸出到NUL時會判斷錯誤
後來上Stackoverflow詢問得到可以使用GetConsoleMode來判斷終端機模式:
 1
 2
 3
 4
 5
 6
 7
 8
 9
10
11
12
13
14
15
16
17
18
19
20
21
22
23
24
25
class Program
{
    private enum StdHandle { Stdin = -10, Stdout = -11, Stderr = -12 };
    [DllImport("kernel32.dll")]
    private static extern IntPtr GetStdHandle(StdHandle std);
    [DllImport("kernel32.dll")]
    [System.Runtime.Versioning.ResourceExposure(System.Runtime.Versioning.ResourceScope.Process)]
    internal static extern bool GetConsoleMode(IntPtr hConsoleHandle, out int mode);
    public static bool IsRedirected
    {
        get
        {
            int mode;
            GetConsoleMode(GetStdHandle(StdHandle.Stdout), out mode);
            return mode == 0;
        }
    }

    static void Main(string[] args)
    {
        if (!IsRedirected)
            Console.SetCursorPosition(36, Console.CursorTop);
        Console.WriteLine("Hello World");
    }
}

若使用的.Net Framework版本是在4.5以後的話則可以直接使用Console.IsOutputRedirected進行判斷
1
2
3
4
5
6
7
8
9
class Program
{
    static void Main(string[] args)
    {
    if (!Console.IsOutputRedirected)
        Console.SetCursorPosition(36, Console.CursorTop);
        Console.WriteLine("Hello World");
    }
}


Reference:

2015/1/5

【C#】讓使用者動態調整控制元件大小,以按鈕為例

讓控制元件(Control Components,如按鈕、標籤...等)可以供使用者自由調整大小,首先準備一個小圖示提示使用者該元件可以隨心所欲的調整大小。
接著在Form中新增一個按鈕(Button)元件,並命名為button1,將準備好的提示圖片加入button1的Image屬性,並設定ImageAlign為BottomRight,讓提示圖片顯示在按鈕的右下角。
在Form類別中加入成員屬性
1
private bool resize = false;
最後註冊按鈕的MouseMove事件即可:
在MouseMove事件中加入下列程式碼
 1
 2
 3
 4
 5
 6
 7
 8
 9
10
11
12
13
14
15
16
17
18
19
20
21
22
23
private void button1_MouseMove(object sender, MouseEventArgs e)
{
    Button btn = (Button)sender;
    if (e.Button == MouseButtons.Left && resize)
    {
        btn.Width = e.X;
        btn.Height = e.Y;
    }
    else
    {
        Point pt = btn.PointToClient(Control.MousePosition);
        if (pt.X > btn.Width - 5 && pt.Y > btn.Height - 5)
        {
            btn.Cursor = Cursors.SizeNWSE;
            resize = true;
        }
        else
        {
            btn.Cursor = Cursors.Default;
            resize = false;
        }
    }
}
首先判斷滑鼠移入控制元件範圍時resize變數是否已經被設定並且滑鼠左鍵有被按壓,先看else(resize變數還未設定這邊),用Control.MousePosition取得游標在螢幕的座標位置並運用button1的成員函數PointToClient算出游標在button1中的座標,判斷若游標靠近右下角5個畫素點的話就把游標圖示改成調整大小的游標圖示並將resize變數設定為true開啟調整大小的功能,否則將游標還原成預設圖示。
  接著看if區塊,只要符合調整大小的要素,就把按鈕的寬高分別指定為e.X與e.Y即可。

【C#】讓控制元件可在視窗中自由移動,以按鈕為例

  想讓控制元件(Control Component,如:按鈕、標籤...等)可以在視窗中自由移動只需要註冊MouseDown與MouseMove兩個事件並加入一些程式碼即可達成:
  1. 首先在Form中加入一個按鈕,在此範例名稱設定為button1
  2. 在Form類別中增加一個成員屬性
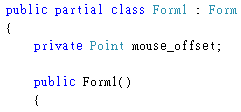
    private Point mouse_offset;
    
  3. 註冊button1的MouseDown事件,加入下面程式碼記錄滑鼠點擊位置(此位置是以按鈕左上角為原點的座標)
    private void button1_MouseDown(object sender, MouseEventArgs e)
    {
        mouse_offset = new Point(-e.X, -e.Y);
    }
    
  4. 註冊button1的MouseMove事件,加入下面程式碼
     1
     2
     3
     4
     5
     6
     7
     8
     9
    10
    private void button1_MouseMove(object sender, MouseEventArgs e)
    {
        if (e.Button == MouseButtons.Left)
        {
            Button btn = (Button)sender;
            Point mousePos = PointToClient(Control.MousePosition);
            mousePos.Offset(mouse_offset.X, mouse_offset.Y);
            btn.Location = mousePos;
        }
    }
    
    Control.MousePosition可以取得滑鼠在螢幕中的座標值,但因按鈕是附著於Form視窗,因此必須使用PointToClient方法把螢幕做標值轉換為Form視窗中的座標值。
    使用者可能是點擊按鈕左上角以外的位置,因此需使用第七行做Offset修正,否則移動放開後按鈕總會落在滑鼠的右下方。

2015/1/1

【C#】製作不規則形狀的控制元件,以按鈕為例

Custom Button, Irregularly shaped control
製作一個不規則的控制元件(Non-rectangular Controls)相對不規則視窗較為複雜一點,但也只是要自己多敲一些代碼而已,在示範中會運用GraphicsPath類別與控制元件的Paint事件來製作一對鬥雞眼按鈕:
  1. 首先在Form中加入一個按鈕(Button)元件,在此把該按鈕命名為CustomButton,並把Text顯示文字清空(清空文字只是為了讓外觀較為乾淨,若有需要可以設定要顯示的文字內容),按鈕大小設定為100x50
  2. 幫此按鈕註冊Paint事件,在此事件中運用GraphicsPath生成一個物件並設定欲顯示圖樣路徑,最將此物件指定給按鈕的Region屬性即可。
    private void CustomButton_Paint(object sender, PaintEventArgs e)
    {
        System.Drawing.Drawing2D.GraphicsPath myGraphicsPath = new System.Drawing.Drawing2D.GraphicsPath();
        myGraphicsPath.AddEllipse(new Rectangle(0, 0, 50, 50));
        myGraphicsPath.AddEllipse(new Rectangle(30, 35, 10, 10));
        myGraphicsPath.AddEllipse(new Rectangle(50, 0, 50, 50));
        myGraphicsPath.AddEllipse(new Rectangle(60, 35, 10, 10));
        CustomButton.BackColor = Color.Brown;
        CustomButton.FlatStyle = FlatStyle.Flat;
        CustomButton.FlatAppearance.BorderSize = 0;
        CustomButton.Region = new Region(myGraphicsPath);
    }
    
補充:

  1. GraphicsPath內建多種預設圖形,如:圓形、舉行、三角形,甚至是文字等,因此可以輕易透過疊加方式繪出各種客製化的形狀。
  2. 在GraphicsPath中的圖形疊加具有互斥或的效果,意思是如果兩個圖案有重疊到的區域會呈現挖空效果,但如果又有第三張圖片重疊上去,則三張圖片重疊的區域會被顯示。

2014/12/31

【C#】製作不規則的視窗

  在C#中要建立不規則視窗(Irregularly Shaped Window)非常簡單,只需要準備一張欲顯示形狀的底圖並修改幾個視窗屬性(Window Properties)即可完成:
  1. 設定FormBorderStyleNone

    可透過設定頁面完成設定或是直接撰寫程式
    FormBorderStyle = System.Windows.Forms.FormBorderStyle.None;
    
  2. 指定BackgroundImage並依據需求設定BackgroundImageLayout
  3. 設定TransparentKey為底圖不要顯示部分的顏色,若使用範例圖片則設定為白色
  4. 到目前為止已經完成客製化的視窗介面,編譯並執行可以看到視窗呈現愛心形狀,心型以外區域可以顯示桌面內容,點選心型以外的區域也可不受限制
  因為一開始我們把FormBorderStyle設定為None,邊框都不顯示連帶的最上面的標題列與控制盒(最小、縮小、最大化按鈕)也一併被取消了,因此若需要相關控制必須自行增加相關按鈕實現,底下示範移動視窗功能:
  1. 切換到檢視程式碼視窗,在視窗類別中增加變數
    private Point mouse_offset;
    
  2. 增加MouseDown事件
    private void Form1_MouseDown(object sender, MouseEventArgs e)
    {
        mouse_offset = new Point(-e.X, -e.Y);
    }
    
  3. 增加MouseMove事件
    private void Form1_MouseMove(object sender, MouseEventArgs e)
    {
        if (e.Button == MouseButtons.Left)
        {
            Point mousePos = Control.MousePosition;
            mousePos.Offset(mouse_offset.X, mouse_offset.Y);
            Location = mousePos;
        }
    }
    
  4. 若不是透過屬性視窗新增事件,記得自己手動加入事件註冊
    this.MouseDown += new System.Windows.Forms.MouseEventHandler(this.Form1_MouseDown);
    this.MouseMove += new System.Windows.Forms.MouseEventHandler(this.Form1_MouseMove);
    
  完成上述步驟後,此視窗就可以透過滑鼠左鍵拖曳進行移動了!

範例用圖:

2014/11/6

國父紀念館

  國父紀念館可說是陸客到台北市的必訪景點之一,從國父紀念館可以直接看到101大樓,兩個景點非常靠近,很多大陸團行程應該是早上到國父紀念館參觀接著就到101吃鼎泰豐到觀景台遠眺台北市景吧!

  國父紀念館外的走廊常常會被學生團體用來排練活動。

到國父紀念館參訪重要行程就是瞻仰國父雕像,跟中正紀念堂一樣雕像兩旁會有儀隊站崗,整點一到會有交接表演活動,很多遊客會在20分鐘前就先來卡位等候表演,若想觀賞表演的話可不能等到整點才到。

面對國父雕像右邊進去是東室,主要陳列國父生平相關史蹟,一進去會看到整片牆的建國大綱十分壯觀。

天花板則以國徽裝飾,館內有志工提供導覽講解。

面對國父雕像左側為西室,主要介紹國父提倡的三民主義思維與民主體驗,也有志工可做導覽解說。

西室有設置模擬投票所,可以體驗投票的感覺。

另外值得一提的是,國父紀念館也常是台灣影視娛樂三大獎(金馬獎、金鐘獎與金曲獎)的頒獎地點,時間來對的話說不定還可看到繽紛絢麗的星光大道!