2018/5/10

Tashiba & Samsung UFS Device Naming Rule

記錄一下兩家Flash大廠UFS產品的命名規則資訊

再補上稍舊的資訊

2018/2/13

【C#】關於UI跨執行緒控制元件的問題

情境說明:在視窗介面開發常常會為了避免視窗凍結而將執行較久的函數用執行緒(Threading)去執行,若過程中需要把一些資訊丟到視窗元件上或是從視窗元件取得特定資料,就會發生跨執行緒存取權限的問題(=> 使用的執行緒與建立控制項的執行緒不同)。

解決方法:透過C# Delegate(委派)機制把工作丟給另個執行緒(控制元件的執行緒)代為處理

委派的寫法其實很簡單,其實就是幫元件寫個CallBack Function,在函數中首先先判斷元件是否在同個執行緒,若不是則呼叫CallBack Function(底下範例的if區塊),如果是則看需求把動作完成即可
 1
 2
 3
 4
 5
 6
 7
 8
 9
10
11
12
13
delegate void TextBoxAppendCallback(TextBox Ctl, string Str);
public void TextBoxAppend(TextBox Ctl, string Str)
{
    if (Ctl.InvokeRequired)
    {
        TextBoxAppendCallback d = new TextBoxAppendCallback(TextBoxAppend);
        this.Invoke(d, new object[] { Ctl, Str });
    }
    else
    {
        Ctl.AppendText(Str);
    }
}
若只有幾個地方需要用到元件存取,可以考慮偷懶一點的寫法
1
2
3
4
this.Invoke((MethodInvoker)delegate()
{
    textBox1.AppendText("Hello, Sleep 3 Seconds ..." + Environment.NewLine);
});

完整範例

 1
 2
 3
 4
 5
 6
 7
 8
 9
10
11
12
13
14
15
16
17
18
19
20
21
22
23
24
25
26
27
28
29
30
31
32
33
34
35
36
37
38
39
40
41
42
public partial class Form1 : Form
{
	public Form1()
	{
		InitializeComponent();
	}

	delegate void TextBoxAppendCallback(TextBox Ctl, string Str);
	public void TextBoxAppend(TextBox Ctl, string Str)
	{
		if (Ctl.InvokeRequired)
		{
			TextBoxAppendCallback d = new TextBoxAppendCallback(TextBoxAppend);
			this.Invoke(d, new object[] { Ctl, Str });
		}
		else
		{
			Ctl.AppendText(Str);
		}
	}

	private void Test()
	{
		this.Invoke((MethodInvoker)delegate()
		{
			textBox1.AppendText("Hello, Sleep 3 Seconds ..." + Environment.NewLine);
		});
		Thread.Sleep(3000);
		this.Invoke((MethodInvoker)delegate()
		{
			textBox1.AppendText("I'm Back, Oh Wait One More Second, Please ..." + Environment.NewLine);
		});
		Thread.Sleep(1000);
		TextBoxAppend(textBox1, "Everything Is Done" + Environment.NewLine);
	}

	private void button1_Click(object sender, EventArgs e)
	{
		var thread = new Thread(Test);
		thread.Start();
	}
}

2018/1/13

【Focus】一萬公里保養工單

記錄一下去年十月回廠一萬公里保養工單,這次總共花費3143元
  • 工資       (900)
  • 5W30合成引擎機油 (498 * 3.8 = 1892)
  • 機油芯      (263)
  • 放油塞墊片    (88)
跟五千公里相比主要是工資多了300元,大概是多了輪胎對調工資才多加0.5個單位吧!?


2017/12/28

【C#】偵測Disk插入/卸除


要在C#中偵測磁碟機的改變(新增/插入、移除/卸除)可以透過ManagementEventWatcher類別加上Windows提供的WMI來達到此功能,直接看程式碼內容:

 1
 2
 3
 4
 5
 6
 7
 8
 9
10
11
12
13
14
15
16
17
18
19
20
21
22
23
24
25
26
27
28
29
30
31
32
33
34
using System;
using System.Collections.Generic;
using System.Linq;
using System.Text;
using System.Management;

namespace DiskDetect
{
    class Program
    {
        static void Main(string[] args)
        {
            ManagementEventWatcher watcher = new ManagementEventWatcher();
            WqlEventQuery query = new WqlEventQuery("SELECT * FROM Win32_VolumeChangeEvent WHERE EventType = 2 or EventType = 3");
            watcher.EventArrived += new EventArrivedEventHandler(watcher_EventArrived);
            watcher.Query = query;
            watcher.Start();

            Console.ReadLine();
        }

        static void watcher_EventArrived(object sender, EventArrivedEventArgs e)
        {
            if (Convert.ToInt16(e.NewEvent.Properties["EventType"].Value) == 2)
            {
                Console.WriteLine("Disk Insert: " + e.NewEvent.Properties["DriveName"].Value);
            }
            else
            {
                Console.WriteLine("Disk Remove: " + e.NewEvent.Properties["DriveName"].Value);
            }
        }
    }
}

參考連結:
ManagementEventWatcher Class
Win32_VolumeChangeEvent

Keyword: How to detect disk state in C# language

2017/12/21

【AutoIt】插入一個執行時期的錯誤

在任何程式語言要插入一個執行時期錯誤(run time error)最快的方式大概就是誤用陣列吧,所以要在AutoIt中埋入一個執行時期錯誤最簡單的方式也不外乎是用這招,直接看底下範例:

1
2
3
4
5
6
#cs
Inject a run time error for autoit script
#ce
Global $arr[1]
$arr[0] = 50
MsgBox(0, "Run Time Error", $arr[1])


2017/4/6

【Focus】新成員:鐵男?小白?

想法真的會隨時間改變,原先很篤定先買房再買車,踏入社會堅守了六年左右還是轉念了,至於買車用途也不是為了上下班代步,很單純就是假日能自由的跑遠?


2017/3/25

【Focus】五千公里保養工單

由於車子比較少使用里程累積速度較慢,滿半年也不過多了五千公里的里程,不然根據手冊每一萬公里再回廠保養即可。
這次回廠一樣就讓接待直接帶出保養套餐,很好說話的我還是沒能成功ㄠ到折扣優惠,最後得到一瓶全效機油添加劑,看在接待跟技師都很熱心幫忙處理車子就不計較那點折扣了,這次仍是指定吳振毅技師幫忙,沒什麼考量想法,第一次找他是因為論壇車友鼎力推薦,這次還回去找他就是第一次過程覺得還不錯就繼續讓他服務囉,畢竟固定技師保養以後車有什麼怪毛病應該可以得到比較多的用心吧...!?

2017/3/23

【Focus】一千公里保養工單

在FSC & Mobile論壇上翻了一堆技師推薦文,最後決定回到台中九和復興廠找吳振毅技師幫忙保養,第一次進廠保養全程跟著一起看底盤與所有的保養工序,也問了很多關於開車與養車觀念,吳技師滿建談的,稍微問個開頭就可以一路一直聊下去,比較麻煩的是指定吳振毅技師太熱門了,至少需要提早兩個星期預約比較不會撲空!

2016/4/22

【LeetCode 231】Power of Two

LeetCode 231: Power of Two
Question: Given an integer, write a function to determine if it is a power of two.

1
2
3
bool isPowerOfTwo(int n) {

}

Solution

1
2
3
bool isPowerOfTwo(int n) {
    return n > 0 && (n & (n - 1)) == 0;
}

解析
在二進位中,只有出現一次1即為2的冪次方
0001 => 1
0010 => 2
0100 => 4
1000 => 8
因此可用bit operator判斷完成題目要求
(n & (n -1)) == 0
描述式採用進位特性,來消除最低位的1,執行一次後若數值為0則表示只有一個1,因此可以判斷為2的冪次
考量題目框架帶入的參數值是帶有正負號的int型別,所以要多判斷數值是否大於0

2016/2/25

【RaspberryPi】開機自動登入UART終端機

新版的Raspbian Jessie系統除了將Kernel升級到4.1也採用了systemd,因此若要設定自動登入必須改變方法
  1. 把設定檔放到/etc/systemd/system目錄下
    sudo cp /lib/systemd/system/serial-getty@.service /etc/systemd/system/serial-getty@ttyAMA0.service
    
  2. 編輯設定檔內容
    sudo vi /etc/systemd/system/serial-getty@ttyAMA0.service
    
  3. 找到下面這行
    ExecStart=-/sbin/agetty --keep-baud 115200,38400,9600 %I $TERM
    
  4. 加入--autologin pi即可
    ExecStart=-/sbin/agetty --autologin pi --keep-baud 115200,38400,9600 %I $TERM
    
  5. 若要自動登入為root則改成--autologin root
    ExecStart=-/sbin/agetty --autologin root --keep-baud 115200,38400,9600 %I $TERM
    
Keyword:樹莓派、RPi、Auto Login

2016/1/12

Cross Compile For netperf


  1. 下載source code (官網: http://www.netperf.org/)
    $ wget ftp://ftp.netperf.org/netperf/netperf-2.7.0.tar.gz
    
  2. 解壓縮套件
    $ tar zxvf netperf-2.7.0.tar.gz
    
  3. 進入source code目錄執行configure配置編譯選項
    $ ./configure CC=/opt/ti-am335x-linux-devkit-08.00.00.00/bin/arm-linux-gnueabihf-gcc --host arm --config-cache
    
  4. 若有出現下列錯誤,則執行執行步驟5,否則直接執行步驟6進行編譯即可
    checking for sys/socket.h... (cached) yes
    checking types of arguments for select... int,fd_set *,struct timeval *
    checking whether setpgrp takes no argument... configure: error: cannot check setpgrp when cross compiling
    
  5. 修正setpgrp錯誤
    $ echo "ac_cv_func_setpgrp_void=yes" > config.cache
    
  6. 執行編譯
    $ make
    
  7. 編譯成功後可在src目錄下看到netperf與netserver,即可傳到目標機台上進行驗證

2016/1/5

Segmentation fault:FTP傳輸型態在搞鬼

首先看下面這段簡單的Hello World程式碼,按理說編譯完直接丟到目標機台上執行應該不會有什麼問題才對。
但卻一直發生Segmentation fault的錯誤提示
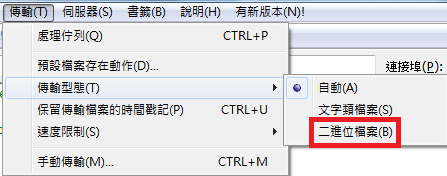
後來發現是因為使用FileZilla傳輸造成的,FileZilla有個設定值:傳輸型態,預設為自動,將這設定值改為二進位檔案即可解決此問題。

2015/9/7

iw指令連線操作記錄

以下範例假定無線網卡裝置名稱為wlan0(通常會是這名字),若不知道可以透過ifconfig -a指令查詢無線網卡裝置名稱。

確認無線裝置連線狀態
# iw wlan0 link
Not connected.
如果沒有任何連線,則會顯示Not connected,否則會顯示連線的相關資訊

掃描鄰近的wifi廣播訊號
# iw wlan0 scan

連線到WPA/WPA2加密的無線網路
# wpa_passphrase APPLE >> /tmp/wifi.conf
1234509876
APPLE是無線網路的SSID資訊,輸入上述指令會停住等待使用者輸入連線密碼,1234509876即為設定的密碼,輸入完後按下Enter即會自動產生連線相關文件
# reading passphrase from stdin
network={
 ssid="APPLE"
 #psk="1234509876"
 psk=a36065d029db325508281a51a19f8fff1c389c11129a74b6c6d3a25200cae713
}
連線指令
# wpa_supplicant -B -i wlan0 -c /tmp/wifi.conf
若沒跳出任何錯誤訊息應該就完成連線了
這時可以查詢連線狀態
# iw wlan0 link
Connected to 36:a3:95:d7:a7:55 (on wlan0)
 SSID: APPLE
 freq: 2437
 RX: 59639 bytes (440 packets)
 TX: 12188 bytes (76 packets)
 signal: -58 dBm
 tx bitrate: 65.0 MBit/s MCS 7

 bss flags: short-preamble short-slot-time
 dtim period: 3
 beacon int: 100

要求DHCP伺服器配發動態IP
# dhclient wlan0

2015/7/20

在Linux系統上製作Windows的USB安裝隨身碟(EFI支援的GPT格式)

不論在Linux或是Windows上要製作Linux安裝隨身碟都有現成套件可以輕易完成(如UNetbootin),但反過來要在Linux系統上製作Windows安裝隨身碟就沒這麼容易了,但也只需要幾個步驟就可以了!
目前還是EFI跟Legacy BIOS的接棒時期,安裝隨身碟也就分為EFI支援的GPT格式跟Legacy BIOS的MBR格式,這篇文章方法僅適用GPT格式。

先安裝gparted套件對隨身碟進行磁區分割
sudo apt-get install gparted
sudo gparted
  1. 在右上角下拉式選單中,選擇隨身碟裝置。
  2. 卸載隨身碟裝置
    功能列選單:Partition > Unmount
  3. 建立Partition表格
    功能列選單:Device > Create Partition Table ...
    選擇gpt
  4. 建立分割區
    功能列選單:Partition > New
    選擇fat32
  5. 儲存變更
    Ctrl + Enter
  6. 關閉gparted
掛載windows安裝印象檔(*.iso)並將內容複製到隨身碟
sudo mkdir /mnt/iso /mnt/usb
sudo mount *.iso /mnt/iso
sudo mount /dev/sdXY /mnt/usb
sudo cp -R /mnt/iso/* /mnt/usb

完成上述步驟後就可以重新開機,並將開機裝置指定到隨身碟,就會進入Windows安裝界面了。目前驗證過Windows7(64-bits)與Windows8(64-bits)均能成功進入安裝畫面。

2015/7/16

【治具】RS232 迴路測試每根Pin腳功能

RS232是個歷久不衰的訊號通訊協議,雖然在主流電腦上已經很難看見其蹤跡,但在伺服器或是嵌入式裝置乃至於近年很夯的物連網裝置都很容易見到,這篇文章主要記錄如何設計硬體治具並撰寫對應測試程式。

首先可以先參考RS232每根Pin腳的功能用途,網路上有大量文章介紹,就不再贅述,可以參考連結:Ethernut RS-232 Primer

先看做好的治具成品圖

治具硬體Rework
  1. 使用4.7kOhm電阻將TxD與RxD串接起來,如果只需要驗證資料傳輸只需做這部分重工即可,大部分情況下(未使用Hardware Flow Control)其他Pin腳都不會用到。
  2. 使用4.7kOhm電阻將DCD與DSR串接起來。
  3. 將DSR跟DTR直接短路串接。
  4. 使用4.7kOhm電阻將RI與CTS串接起來。
  5. 將CTS跟RTS直接短路串接。
測試概念
  1. 從TX發送資料,硬體TxD與RxD已經串接,因此會收到送出資料,確認收到資料並比對資料內容即可確認TxD與RxD腳位功能是否正常。
  2. 硬體RTS與CTS及RI串接,因此設置/重置RTS訊號,再讀取CTS與RI訊號即可確認這三根腳位功能是否正常。
  3. 硬體DTR與DSR及DCD串接,因此設置/重置DTR訊號,再讀取DSR與DCD訊號即可確認這三根腳位功能是否正常。
程式碼實做
  1
  2
  3
  4
  5
  6
  7
  8
  9
 10
 11
 12
 13
 14
 15
 16
 17
 18
 19
 20
 21
 22
 23
 24
 25
 26
 27
 28
 29
 30
 31
 32
 33
 34
 35
 36
 37
 38
 39
 40
 41
 42
 43
 44
 45
 46
 47
 48
 49
 50
 51
 52
 53
 54
 55
 56
 57
 58
 59
 60
 61
 62
 63
 64
 65
 66
 67
 68
 69
 70
 71
 72
 73
 74
 75
 76
 77
 78
 79
 80
 81
 82
 83
 84
 85
 86
 87
 88
 89
 90
 91
 92
 93
 94
 95
 96
 97
 98
 99
100
101
102
103
104
105
106
107
108
109
110
111
112
113
114
115
116
117
118
119
120
121
122
123
124
125
126
127
128
129
130
131
// File name: uart.c
// gcc -o uart uart.c

#include <stdlib.h>
#include <stdio.h>
#include <string.h>
#include <unistd.h>
#include <sys/ioctl.h>
#include <fcntl.h>
#include <termios.h>

int main (int argc, char *argv[])
{
 int ret = 0;
 int len;
 unsigned char buf[16] = {0xAA, 0x55, 0x00, 0xFF,
    0x5A, 0xA5, 0xF0, 0x0F,
    0x01, 0x02, 0x04, 0x08,
    0x10, 0x20, 0x40, 0x80};
 unsigned char buf_rev[16];
 int fd;
 FILE *fp = NULL;
 int status;
 struct termios tio;
 
 if (argc <= 1) {
  fprintf(stderr, "Usage: %s <dev>\n", argv[0]);
  ret = 255;
  goto end;
 }

 fp = fopen (argv[1], "w+");
 if (fp == NULL) {
  puts ("Fail to open device");
  ret = 255;
  goto end;
 }
 
 printf ("+ TX: ");
 fflush (fp);
 len = fwrite (buf, sizeof (char), 16, fp);
 fflush (fp);
 if (len < 16) {
  puts ("Fail to transfer data");
  ret = 255;
  goto clean;
 }
 puts ("Pass");

 printf ("+ RX: ");
 len = fread (buf_rev, sizeof (char), 16, fp);
 if (len < 16) {
  puts ("Fail to receive data");
  ret = 255;
  goto clean;
 } else if (memcmp (buf, buf_rev, 16) != 0) {
  puts ("Check data fail");
  ret = 255;
  goto clean;
 }
 puts ("Pass");
 fclose (fp);
 fp = NULL;

 if ( (fd = open (argv[1], O_RDWR)) < 0 ) {
  puts ("Fail to open device");
  ret = 255;
  goto end;
 }

 tcgetattr(fd, &tio);
 printf ("RTS -> CTS - RI: ");
 status |= TIOCM_RTS;
 ioctl(fd, TIOCMSET, &status);
 ioctl(fd, TIOCMGET, &status);
 ret = status & (TIOCM_CTS | TIOCM_RNG); // Should be 0xA0

 status &= ~TIOCM_RTS;
 ioctl(fd, TIOCMSET, &status);
 ioctl(fd, TIOCMGET, &status);
 if ( (status & (TIOCM_CTS | TIOCM_RNG)) || ret != 0xA0) { // Status should be 0x00, false
  puts ("FAIL");
  if (ret == 0x0)
   puts ("  --> Case1: RTS fail; Case2: CTR & RI fail");
  else if (ret == 0x80)
   puts ("  --> CTS fail");
  else if (ret == 0x20)
   puts ("  --> RI fail");
  else
   puts ("  -> RTS fail");
  ret = 6;
  goto clean;
 } else {
  puts ("PASS");
  ret = 0;
 }

 printf ("DTR -> DSR - DCD: ");
 status |= TIOCM_DTR;
 ioctl(fd, TIOCMSET, &status);
 ioctl(fd, TIOCMGET, &status);
 ret = status & (TIOCM_DSR | TIOCM_CAR); // Should be 0x140
 status &= ~TIOCM_DTR;
 ioctl(fd, TIOCMSET, &status);
 ioctl(fd, TIOCMGET, &status);
 if ( (status & (TIOCM_DSR | TIOCM_CAR)) || ret != 0x140) { // Status should be 0x00, false
  puts ("FAIL");
  if (ret == 0x0)
   puts ("  --> Case1: DTR fail; Case2: DSR & DCD fail");
  else if (ret == 0x100)
   puts ("  --> DCD fail");
  else if (ret == 0x40)
   puts ("  --> DSR fail");
  else
   puts ("  -> RTS fail");
  ret = 7;
  goto clean;
 } else {
  puts ("PASS");
  ret = 0;
 }

clean:
 if (fp)
  fclose (fp);
 if (fd > 0)
  close (fd);
end:
 printf("Return Code: %d\n", ret);
 return ret;
}

參考連結

2015/7/8

Trace shell script的小技巧

參考上圖,有三個script,先執行test1.sh,會帶起test2.sh;test2.sh會再帶起test3.sh,如果從test1.sh開始了解程式架構,很容易就可以得知彼此之間的執行關係;但有時候線頭只抓到test2.sh或是test3.sh時就麻煩了。
  在Linux下可以使用bash maintain的$PPID變數再搭配ps指令就可以慢慢推敲出script file的呼叫關係。

直接看範例:
#!/bin/sh
# file: test1.sh

echo $0
echo "Execute by `ps -o comm -h --pid $PPID`"
echo ===========
./test2.sh

#!/bin/sh
# file: test2.sh

echo $0
echo "Execute by `ps -o comm -h --pid $PPID`"
echo ===========
./test3.sh

#!/bin/sh
# file: test3.sh

echo $0
echo "Execute by `ps -o comm -h --pid $PPID`"
echo ===========

執行結果:
./test1.sh
Execute by bash
===========
./test2.sh
Execute by test1.sh
===========
./test3.sh
Execute by test2.sh
===========

2015/7/7

更改Shell輸出文字的顏色、底線、粗體等控制

要在Shell輸出文字中有顏色改變、底線與粗體效果,需要用到如下的控制碼:
printf "'\033[0;31m'Hello'\033[0m'"
會在螢幕上顯示紅色的Hello,但這樣要記住所有效果的代碼也不是辦法,可以將每種效果定義為一種變數,如此要調用就會簡單多了,如下可以達到相同效果:
Red='\033[0;31m'
NC='\033[0m'

printf "${Red}Hello${NC}"

完整的效果定義
#!/bin/bash
# File: color.sh

# Regular Colors
Black='\033[0;30m'
Red='\033[0;31m'
Green='\033[0;32m'
Yellow='\033[0;33m'
#Orange='\033[0;33m'
Blue='\033[0;34m'
Purple='\033[0;35m'
Cyan='\033[0;36m'
White='\033[0;37m'

# Bold
BBlack='\033[1;30m'
BRed='\033[1;31m'
BGreen='\033[1;32m'
BYellow='\033[1;33m'
BBlue='\033[1;34m'
BPurple='\033[1;35m'
BCyan='\033[1;36m'
BWhite='\033[1;37m'

# Underline
UBlack='\033[4;30m'
URed='\033[4;31m'
UGreen='\033[4;32m'
UYellow='\033[4;33m'
UBlue='\033[4;34m'
UPurple='\033[4;35m'
UCyan='\033[4;36m'
UWhite='\033[4;37m'

# Background
GBlack='\033[40m'
GRed='\033[41m'
GGreen='\033[42m'
GYellow='\033[43m'
GBlue='\033[44m'
GPurple='\033[45m'
GCyan='\033[46m'
GWhite='\033[47m'

# High Intensity
IBlack='\033[0;90m'
IRed='\033[0;91m'
IGreen='\033[0;92m'
IYellow='\033[0;93m'
IBlue='\033[0;94m'
IPurple='\033[0;95m'
ICyan='\033[0;96m'
IWhite='\033[0;97m'

# Bold High Intensity
BIBlack='\033[1;90m'
BIRed='\033[1;91m'
BIGreen='\033[1;92m'
BIYellow='\033[1;93m'
BIBlue='\033[1;94m'
BIPurple='\033[1;95m'
BICyan='\033[1;96m'
BIWhite='\033[1;97m'

# High Intensity Background
GIBlack='\033[0;100m'
GIRed='\033[0;101m'
GIGreen='\033[0;102m'
GIYellow='\033[0;103m'
GIBlue='\033[0;104m'
GIPurple='\033[0;105m'
GICyan='\033[0;106m'
GIWhite='\033[0;107m'

LightGray='\033[0;37m'
DarkGray='\033[1;30m'
LightRed='\033[1;31m'
LightGreen='\033[1;32m'
Yellow='\033[1;33m'
LightBlue='\033[1;34m'
LightPurple='\033[1;35'
LightCyan='\033[1;36'

NC='\033[0m'

效果Demo
#!/bin/bash
# File: color_demo.sh
. color.sh

printf "${Black}Black${NC}\n"
printf "${Red}Red${NC}\n"
printf "${Green}Green${NC}\n"
printf "${Yellow}Yellow${NC}\n"
printf "${Blue}Blue${NC}\n"
printf "${Purple}Purple${NC}\n"
printf "${Cyan}Cyan${NC}\n"
printf "${White}White${NC}\n"

printf "${BBlack}BBlack${NC}\n"
printf "${BRed}BRed${NC}\n"
printf "${BGreen}BGreen${NC}\n"
printf "${BYellow}BYellow${NC}\n"
printf "${BBlue}BBlue${NC}\n"
printf "${BPurple}BPurple${NC}\n"
printf "${BCyan}BCyan${NC}\n"
printf "${BWhite}BWhite${NC}\n"

printf "${UBlack}UBlack${NC}\n"
printf "${URed}URed${NC}\n"
printf "${UGreen}UGreen${NC}\n"
printf "${UYellow}UYellow${NC}\n"
printf "${UBlue}UBlue${NC}\n"
printf "${UPurple}UPurple${NC}\n"
printf "${UCyan}UCyan${NC}\n"
printf "${UWhite}UWhite${NC}\n"

printf "${GBlack}GBlack${NC}\n"
printf "${GRed}GRed${NC}\n"
printf "${GGreen}GGreen${NC}\n"
printf "${GYellow}GYellow${NC}\n"
printf "${GBlue}GBlue${NC}\n"
printf "${GPurple}GPurple${NC}\n"
printf "${GCyan}GCyan${NC}\n"
printf "${GWhite}GWhite${NC}\n"

printf "${IBlack}IBlack${NC}\n"
printf "${IRed}IRed${NC}\n"
printf "${IGreen}IGreen${NC}\n"
printf "${IYellow}IYellow${NC}\n"
printf "${IBlue}IBlue${NC}\n"
printf "${IPurple}IPurple${NC}\n"
printf "${ICyan}ICyan${NC}\n"
printf "${IWhite}IWhite${NC}\n"

printf "${BIBlack}BIBlack${NC}\n"
printf "${BIRed}BIRed${NC}\n"
printf "${BIGreen}BIGreen${NC}\n"
printf "${BIYellow}BIYellow${NC}\n"
printf "${BIBlue}BIBlue${NC}\n"
printf "${BIPurple}BIPurple${NC}\n"
printf "${BICyan}BICyan${NC}\n"
printf "${BIWhite}BIWhite${NC}\n"

printf "${GIBlack}GIBlack${NC}\n"
printf "${GIRed}GIRed${NC}\n"
printf "${GIGreen}GIGreen${NC}\n"
printf "${GIYellow}GIYellow${NC}\n"
printf "${GIBlue}GIBlue${NC}\n"
printf "${GIPurple}GIPurple${NC}\n"
printf "${GICyan}GICyan${NC}\n"
printf "${GIWhite}GIWhite${NC}\n"
呈現結果

讓ssh連線不用手動輸入密碼(自動登入)

最近專案有個應用:在客戶端透過ssh自動連線到伺服器並下達命令,卻遇到了需要手動輸入密碼的問題,發現ssh有提供公私鑰機制可以免除每次登入都需要輸入密碼,設定步驟也很簡單:
  1. 產生金鑰:在客戶端執行
    ssh-keygen -t rsa -b 2048
    
    過程中會出現Enter passphrase提示輸入訊息,直接按Enter跳過即可
  2. 將產生的公鑰內容上傳到伺服器的~/.ssh/authorized_keys檔案
    ssh-copy-id user_id@server_ip
    
只要完成上述兩個步驟就完成了,步驟2的user_id需替換成遠端連線的帳號、server_ip則是遠端連線的ip,底下稍微做一下說明:
  • 步驟1會產生一組本機的公鑰與私鑰,執行完後可以在~/.ssh目錄下看到兩個檔案
    • id_rsa:私鑰,之後連線會使用這私鑰進行演算後傳送到遠端進行驗證
    • id_rsa.pub:公鑰,內容會儲存在遠端的~/.ssh/authorized_keys檔案內,客戶端傳來的驗證資訊會以這資訊進行驗證
  • 步驟2的ssh-copy-id其實是一隻script(/usr/bin/ssh-copy-id),功能就是把id_rsa.pub內容幫忙存到遠端的~/.ssh/authorized_keys檔案內。

2015/6/1

【QEMU】在X86 PC上執行其他平台(如ARM)程式

情境:要在X86 PC上透過QEMU模擬器執行ARM的程式。

先透過file指令確認執行程式的格式內容為ARM平台所用
$ file hello
hello: ELF 32-bit LSB  executable, ARM, EABI5 version 1 (SYSV), dynamically linked (uses shared libs), for GNU/Linux 2.6.32, BuildID[sha1]=d7efe6f9528e036c383501d6fc0dd1ca6fc880b1, not stripped

qemu最後面加上要執行的程式即可,中間options視需求加入適當的參數
usage: qemu-arm [options] program [arguments...]

先直接執行看看
$ qemu-arm ./hello
/lib/ld-linux.so.3: No such file or directory

qemu不知道去哪裡載入loader,手動指定路徑後再執行看看
$ qemu-arm /usr/arm-linux-gnueabi/lib/ld-2.19.so ./hello
./hello: error while loading shared libraries: libc.so.6: cannot open shared object file: No such file or directory

這時loader需要載入相關library,手動指定動態鏈結檔目錄再執行看看
$ qemu-arm /usr/arm-linux-gnueabi/lib/ld-2.19.so --library-path /usr/arm-linux-gnueabi/lib ./hello
Hello World

這時應該就可以看到正確執行結果了!

2015/4/27

【Ubuntu】架設PXE Server

PXE開機運作原理是Bootloader(PC來說就是BIOS)在開機時動態要求分配IP,在取得IP資訊同時也會收到下一個伺服器的位址與該讀取的檔案資訊,接著透過TFTP服務取得開機核心與檔案系統。所以一台伺服器要提供PXE功能,至少要有DHCP與TFTP伺服器功能,首先安裝這兩個套件:
sudo apt-get install isc-dhcp-server
apt-get install tftpd-hpa inetutils-inetd

指定提供DHCP服務的網路卡
sudo vi /etc/default/isc-dhcp-server
將interface指定為eth0
INTERFACES="eth0"

設定DHCP服務
sudo vi /etc/dhcp/dhcpd.conf

# option definitions common to all supported networks...
#option domain-name "example.org";
#option domain-name-servers ns1.example.org, ns2.example.org;

subnet 192.168.0.0 netmask 255.255.255.0 {
  range 192.168.0.100 192.168.0.253;
  option routers 192.168.0.254;
  option broadcast-address 192.168.0.255;
}
allow booting;
allow bootp;
option option-128 code 128 = string;
option option-129 code 129 = text;
next-server 192.168.0.254;
filename "pxelinux.0";

default-lease-time 600;
max-lease-time 7200;
若有domain name資訊則填入正確資訊,否則將相關兩的兩行敘述註解起來,否則啟動DHCP服務可能會帶不起來。這邊設定IP分配會從192.168.0.100到192.168.0.253,並指定client端取得IP資訊後接著要向192.168.0.254伺服器要求檔案pxelinux.0。
完成設定後重新啟動DHCP服務
sudo service isc-dhcp-server restart

修改tftp設定
sudo vi /etc/default/tftpd-hpa
增加敘述:
RUN_DAEMON="yes"
修改inet.conf
sudo vi /etc/inetd.conf
增加敘述
tftp dgram udp wait root /usr/sbin/in.tftpd /usr/sbin/in.tftpd -s /var/lib/tftpboot

重新啟動tftp服務
sudo service tftpd-hpa restart

到這邊PXE服務就算設定完成了,這時在client端選擇網路開機,應該會成功取得IP配置,但會卡在取得檔案階段,底下說明使用ubuntu server的安裝光碟裡面提供的netboot檔案,讓client可以透過PXE服務開啟安裝程式。

掛載安裝印象檔,並將需要的檔案複製到tftp目錄即可
sudo mount ubuntu-14.10-server-amd64.iso /mnt
sudo cp -avr /mnt/install/netboot/* /var/lib/tftpboot/

這時client在選擇網路開機,就可以進到ubuntu安裝畫面了!